Media Broadcaster: Difference between revisions
| [unchecked revision] | [unchecked revision] |
No edit summary |
No edit summary |
||
| Line 123: | Line 123: | ||
'''sudo reboot''' | '''sudo reboot''' | ||
to check.. | to check.. | ||
| Line 132: | Line 133: | ||
'''ping (your IP Address) -c 5''' | '''ping (your IP Address) -c 5''' | ||
C.Programming for the Audio Streaming | C.Programming for the Audio Streaming | ||
Revision as of 05:18, 16 May 2014
Description
a Rasperry Pi-based appliance that broadcasts video or audio via DILC servers.
Materials
A. Audio Streaming
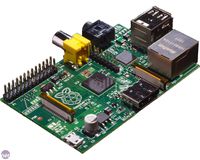
* Raspberry Pi (Model B)

* SD Card with installed Raspbian "Wheezy" OS (Operating System)


* USB Sound Card


* Audio Computer Microphone


* USB Micro Cable with Power Brick (5 Volts, 2 Amperes)


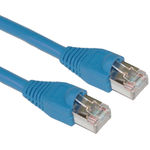
* Ethernet Cable

B. For Programming
  *PC Monitor
  *USB Keyboard
  *USB Mouse
  *VGA to HDMI Cable or RCA Cable
.jpg#.U3Vdg7VDsyY)
Procedure
A. Installing and Running the Rasbian Wheezy OS (Operating System)
- Use Win32 Disk Imager to write a boot image to your SD Card.
- Download the Wheezy zip file and extract the file.
- Insert the SD Card into your Raspberry Pi and write the disk image file using the installed win32 Disk Imager.
B. Setting Static IP
- Check first the set-up by
cat /etc/network/interfaces
then the line iface eth0 inet dhcp implies that the IP address is via DHCP which is dynamically registered by the router.This is what we want to change.
- Get Information
ifconfig
with these you will get the different information that we will use later such as:
inet address (Pi's Current IP Address)
Bcast (The Broadcast IP Range)
Mask (Subnet Mask Address)
then
netstat -nr or route n
(note that these commands will give you the same information)
Get also the
Gateway Address
Destination Address
- Editing Network Configuration
open the file /etc/network/interfaces by:
sudo nano /etc/network/interfaces
change the line
iface eth0 inet dhcp
to
iface eth0 inet static
then after this line directly type the information that we gathered a while ago then save and exit by Ctrl+o and Ctrl+X
next is to reboot..
sudo reboot
to check..
ifconfig
these will reveal the changes or try to ping it with your IP Address by
ping (your IP Address) -c 5
C.Programming for the Audio Streaming
After installing and running the OS of your Raspberry Pi, you are now ready to program the audio streaming.
Open the LX Terminal,
- Install PulseAudio and these preference GUI with the command
sudo apt-get install pulseaudio
sudo apt-get paprefs
sudo reboot
- After the system being rebooted, next thing to do is to edit and add the following lines in the file /etc/pulse/daemon.conf by these command
sudo nano /etc/pulse/daemon.conf
lines:
resample-method = ffmpeg
default-sample-rate = 44100
alternate-sample-rate = 44100
after these save and exit by Ctrl+o and Ctrl+x
- To make the Raspberry Pi audio server appearing automatically in your "Sound Setting" on every client (PC) and the server (raspberry Pi).
sudo sed -i 's/AVAHI_DAEMON_DETECT_LOCAL=1/AVAHI_DAEMON_DETECT_LOCAL=0/g' /etc/default/avahi-daemon
- Activate the network feature of PulseAudio on both client and server.
paprefs
For the server mark the following boxes
Network Server -Enable network access to local sound devices
Network Server -Allow other machines on the LAN to discover local sound devices
Network Server -Don't require authentication
For the client you want to stream from the server (Raspberry Pi)
Network Access -Make discoverable PulseAudio network sound devices available locally
- Reboot the both server and the client by:
sudo reboot
After the system rebooted the Sound Setting should appear like these:

- To check if the streaming is working plug in the Computer Audio Microphone in the USB Sound card and start to talk. note that there will be a delay of 1000ms-2000ms.
Project Team
- Catherine Bagotsay (developer)
- Dawn Benigno (consultant)
- Dan Villareal (consultant)
- Peter Sy (consultant)
References