How to Create a Site: Difference between revisions
No edit summary |
|||
| (47 intermediate revisions by the same user not shown) | |||
| Line 1: | Line 1: | ||
==Create a Site on Pages | ==Create a Site on Pages== | ||
1. Go to [http://pages.upd.edu.ph Pages] <br> | |||
2. Click Login button to show the Login form. | |||
[[File:Pages login button.png|thumb|center]] | |||
3. Login using your DilNet account (@upd) tagged by UPCC as "faculty". | |||
1. Go to [http://pages.upd.edu.ph Pages | [[File:Pages login form.png|thumb|400px|center]] | ||
2. | 4. Once you've logged in, click the '''Site Register''' for site creation. | ||
[[File:Pages site register.png|thumb|200px|center]] | |||
[[File: | 5. Site creation/registration. You need to provide the unique name of your website for the URL https://pages.upd.edu.ph/'''uniquename''', choose the '''Type of site''' and '''Site Visibility'''. | ||
<br> | [[File:Pages site registration.png|thumb|400px|center]] | ||
---------- | |||
==User Menu== | |||
[[File:Pages site register.png|right|thumb|200px]] | |||
6. '''Human Icon''' - Click this to show the menu. <br> | |||
7. '''My Account''' - Click this to see account information. <br> | |||
8. '''Site Register''' - Click this for Site creation/registration. <br> | |||
9. '''ILC Helpdesk''' - Link to ILC Helpdesk. <br> | |||
10. '''Logout''' - Logout from the website.<br> | |||
<br><br><br><br><br><br><br><br> | |||
==Menu== | |||
[[File:Pages Menu.png|thumb|200px|right]] | |||
11.'''Site Content''' - The lists of page and posts of your site are listed here.<br> | |||
12.'''Menus''' - This is where you can add menu to your website.<br> | |||
13.'''Appearance''' - Click this to to change the appearance of your website.<br> | |||
14.'''Taxonomy''' - Taxonomy for your website.<br> | |||
15.'''Settings''' - This is where you can enable and disable Apps/Feature of your website.<br> | |||
16.'''Members&Roles''' - This is where you can add or remove members of your website.<br> | |||
17.'''Help''' - link to help page.<br> | |||
<br><br><br><br><br><br><br><br><br><br> | |||
==Site Configuration== | ==Site Configuration== | ||
[[File:Pages site registration.png|thumb|500px|center]] | |||
18. '''Your URL''' - You can set your site's unique URL. <br> | |||
*'''Personal Site''' - Used for personal sites only ( | 19. '''Type of Site'''- There are three type of site to choose from:<br> | ||
*'''Personal Site''' - Used for personal sites only (Portfolio, Page, Publications) | |||
*'''Project Site''' - Used for project sites consisting of project members | *'''Project Site''' - Used for project sites consisting of project members | ||
*'''Department Site''' - Used for Academic and Administrative sites | *'''Department Site''' - Used for Academic and Administrative sites <br> | ||
<br> | 20. '''Site Visibility''' - You can set the visibility options of your site. <br> | ||
21. Click '''Site Register''' button and start on your Site!<br><br> | |||
<br><br> | <br><br> | ||
'''Note''': There must be a notification that your site is created. Click '''Go there''' to view your website. | '''Note''': There must be a notification that your site is created. Click '''Go there''' to view your website. | ||
| Line 33: | Line 44: | ||
[[File:pages_createsuccess.png]] | [[File:pages_createsuccess.png]] | ||
<br> | <br> | ||
==See Also== | ==See Also== | ||
[[Pages.UPD|Pages.UPD]] | |||
[[Category:Tech Support]] | [[Category:Tech Support]] | ||
Latest revision as of 14:56, 23 April 2021
Create a Site on Pages
1. Go to Pages
2. Click Login button to show the Login form.

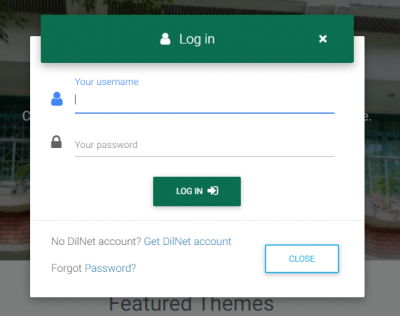
3. Login using your DilNet account (@upd) tagged by UPCC as "faculty".
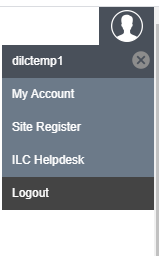
4. Once you've logged in, click the Site Register for site creation.
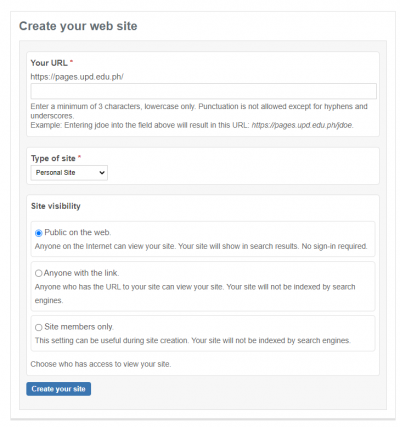
5. Site creation/registration. You need to provide the unique name of your website for the URL https://pages.upd.edu.ph/uniquename, choose the Type of site and Site Visibility.
User Menu

6. Human Icon - Click this to show the menu.
7. My Account - Click this to see account information.
8. Site Register - Click this for Site creation/registration.
9. ILC Helpdesk - Link to ILC Helpdesk.
10. Logout - Logout from the website.
Menu
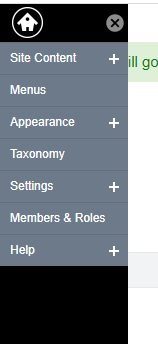
11.Site Content - The lists of page and posts of your site are listed here.
12.Menus - This is where you can add menu to your website.
13.Appearance - Click this to to change the appearance of your website.
14.Taxonomy - Taxonomy for your website.
15.Settings - This is where you can enable and disable Apps/Feature of your website.
16.Members&Roles - This is where you can add or remove members of your website.
17.Help - link to help page.
Site Configuration
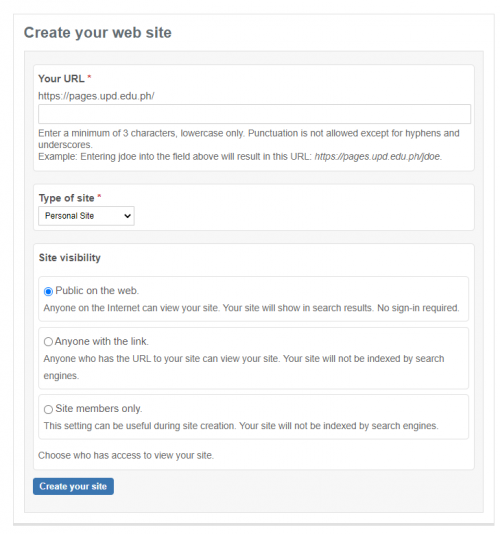
18. Your URL - You can set your site's unique URL.
19. Type of Site- There are three type of site to choose from:
- Personal Site - Used for personal sites only (Portfolio, Page, Publications)
- Project Site - Used for project sites consisting of project members
- Department Site - Used for Academic and Administrative sites
20. Site Visibility - You can set the visibility options of your site.
21. Click Site Register button and start on your Site!
Note: There must be a notification that your site is created. Click Go there to view your website.


