UP-FM Transmitter: Difference between revisions
No edit summary |
|||
| (70 intermediate revisions by 3 users not shown) | |||
| Line 2: | Line 2: | ||
==DESCRIPTION== | ==DESCRIPTION== | ||
A Raspberry Pi-based program FM transmitter that plays online [[UP-FM]] music radio. Radio receivers can | A robust, stable, inexpensive Raspberry Pi-based program FM transmitter that plays online [[UP-FM]] music radio. Radio receivers can be tuned in to 87.5MHz if the transmitter is in range. | ||
Individuals from the different UP campuses, UP alumni and friends in different locations, lovers of Filipino indie music are encouraged to build and use this device to broadcast UP-FM in their areas. | Individuals from the different UP campuses, UP alumni and friends in different locations, lovers of Filipino indie music are encouraged to build and use this device to broadcast UP-FM in their areas. | ||
{| align="right" | {| align="right" | ||
| __TOC__ | | __TOC__ | ||
|} | |} | ||
==COMPONENTS== | ==COMPONENTS== | ||
'''A. For PIFM | '''A. For PIFM''' <br/> | ||
[http://makezine.com/projects/make-38-cameras-and-av/raspberry-pirate-radio/ PIFM] is the core software that will turn Rasperry Pi into an FM station. These are the components you need to run it: | |||
* Raspberry PI (model B). | * Raspberry PI (model B). | ||
| Line 20: | Line 21: | ||
[[File:Raspberry pi model B.jpg|250px]] | [[File:Raspberry pi model B.jpg|250px]] | ||
*SD Card with Raspbian "Wheezy" OS installed. | * SD Card with Raspbian "Wheezy" OS (operating system) installed. | ||
[[File:Sd card.jpeg|250px]] [[File:Raspbian wheezy.png|250px]] | [[File:Sd card.jpeg|250px]] [[File:Raspbian wheezy.png|250px]] | ||
*USB Micro Cable | * [http://iskwiki.upd.edu.ph/index.php/File:Usb_micro_cable.jpg USB Micro Cable] | ||
[ | *[http://iskwiki.upd.edu.ph/index.php/File:Ethernet.jpg Ethernet Cable] | ||
* Power Brick (5 volts, 2 amperes) | |||
[[File:Power brick.jpg|250px]] | |||
[[File: | * Solid wire,no.22 and GPIO Cable (for the antenna) | ||
[[File:Solid wire.jpg|250px]] [[File:Gpio wire.jpg |400px]] | |||
* Soldering iron, Soldering lead, Electrical tape | |||
[[File:Soldering iron.jpg|250px]] [[File:Lead.jpg |150px]] [[File:I-download.jpg|150px]] | |||
'''B. For Programming:''' | |||
* [http://iskwiki.upd.edu.ph/index.php/File:Monitor.jpg PC Monitor] | |||
* | * [http://iskwiki.upd.edu.ph/index.php/File:Mouse.jpg USB Mouse] | ||
[ | * [http://iskwiki.upd.edu.ph/index.php/File:Keyboard.jpg USB Keyboard] | ||
* | * [http://iskwiki.upd.edu.ph/index.php/File:Vga_to_hdmi_cable.jpg VGA to HDMI Cable] | ||
==PROCEDURES== | ==PROCEDURES== | ||
'''A. Making a Simple Antenna | '''A. Making a Simple Antenna''' | ||
Since you may not have an ideal antenna, you will use a solid wire (no.22) as substitute. Cut a solid wire about 32 centimeters and stripe one end at least 1 cm. | |||
Cut the GPIO (general purpose input/output) cable wire near the socket and leave at least 1 cm wire on it. Stripe the wire near the GPIO socket. Combine both ends of the solid wire and GPIO socket using lead and soldering iron. Wrap the soldered wire and GPIO with the tape (see pictures below). | |||
[[File:IMG 20140423 130605.jpg|110px]] [[File:IMG 20140423 130743.jpg|200px]] [[File:IMG 20140423 130855.jpg|200px]] [[File:IMG 20140423 131006.jpg|200px]] | [[File:IMG 20140423 130605.jpg|110px]] [[File:IMG 20140423 130743.jpg|200px]] [[File:IMG 20140423 130855.jpg|200px]] [[File:IMG 20140423 131006.jpg|200px]] | ||
| Line 55: | Line 69: | ||
After making the Antenna, plug it in '''GPIO no.4''' when starting the PIFM. That's the 4th pin from the left on the 2nd row of the group of GPIO pins pictured below. | |||
[[File:Rpi pins.png|500px]] | |||
'''B. Installing and Running Raspbian "wheezy''' | |||
You will now prepare the PIfm in Raspberry PI. To do so, you must have an SD card, with Raspbian "wheezy" OS installed. One way to do it is to download and install the [http://sourceforge.net/projects/win32diskimager '''Win 32 disk imager'''] to your windows PC. Also download [http://www.raspberrypi.org/downloads/ '''zip file of Raspbian "wheezy"'''] and extract the file. Plug in your SD card. Write the disk image file on the SD card.Then you have now the installed Raspbian "wheezy" OS in your SD card. | |||
'''Enabling network connection''' | |||
'''C. Programming the PIFM''' | |||
Once you have installed the Raspbian "wheezy" and ran it to your Raspberry PI, you can now program the UP-FM transmitter from '''LXterminal'''. | |||
* open your lxterminal. | |||
* create a dedicated directory within the home directory and download the pifm files from icrobotics site as follows: | |||
*You will | '''''cd ~''''' | ||
'''''mkdir pifm''''' | |||
'''''cd pifm''''' | |||
'''''wget http://www.icrobotics.co.uk/wiki/images/c/c3/Pifm.tar.gz''''' | |||
'''''tar -xvf Pifm.tar.gz''''' | |||
* download the application called '''sox (Sound Exchange) package.''' This is required to stream the internet radio and pipe it to PIFM program for transmission. | |||
'''''sudo apt-get install sox libsox-fmt-all''''' | |||
* create a script for easier execution. | |||
'''''sudo nano pifmradio.sh''''' | |||
Type following command line inside the nano script and press '''ctrl+x, Y and then Enter''' to save. | |||
'''''#!/bin/bash'''''<br/> | |||
'''''sox -v .9 -t mp3 "http://updox.upd.edu.ph/stream/2/;stream.nsv" -t wav --input-buffer 80000 -r 22050 -c 1 - | sudo /home/pi/pifm/pifm - 87.5 | |||
''''' | |||
* Change the mode of the script to be executable. | |||
'''''sudo chmod +x pifmradio.sh''''' | |||
* To run the script in the background, execute the ff command: | |||
'''''./pifmradio.sh &''''' | |||
You may get the following warning message: | |||
'''''wav: Length in output .wav header will be wrong since can't seek to fix it | |||
''''' | |||
You may safely ignore it. This is due to the fact that you are using a piped output to pifm and sox is issuing a warning that it is not possible to go back to the beginning of the stream and write the correct size into the RIFF/WAVE header, like it would be possible with a physical file. | |||
<br/> | |||
'''Autostarting/Autorun UP-FM at boot''' | |||
*Open new window in lxterminal.Create a folder to store the script in | |||
'''''mkdir ./bin''''' | |||
'''''cd ./bin''''' | |||
*Create the script using the nano text editor | |||
'''''sudo nano script_auto_run''''' | |||
*In the nano editor, type this script: | |||
'''''#!/bin/bash''''' | |||
'''''# Script to start our application''''' | |||
'''''echo "Doing autorun script..."''''' | |||
'''''sudo /home/pi/pifm/pifmradio.sh &''''' | |||
Note that when executing a command without logging in, you have to provide full paths to everything. | |||
'''Save it by pressing Ctrl+X, " Y", ENTER''' | |||
* This script needs to be made executable by typing this : | |||
'''''sudo chmod 755 script_auto_run'' | |||
''' | |||
*You can test the script works by typing | |||
'''''/home/pi/bin/script_auto_run | |||
''''' | |||
*Setting it to be run | |||
To launch the script at startup, '''edit the “rc.local”''' file: | |||
'''''sudo nano /etc/rc.local'' | |||
''' | |||
*Add the following on the lowest line below the word '''fi''' : | |||
'''''/home/pi/bin/script_auto_run''''' | |||
'''Save it by pressing Ctrl+X, " Y", ENTER | |||
''' | |||
Reboot your Rasperry Pi and UP-FM will run. | |||
==DIPOLE ANTENNA== | |||
* See [[Dipole Antenna for UPFM]] | |||
==RF AMPLIFIER== | |||
| Line 67: | Line 224: | ||
* Jhon Mark Sorio | * Jhon Mark Sorio | ||
* Nestor Tiglao (consultant) | * Nestor Tiglao (consultant) | ||
* Peter Sy ( | * Daniel Villareal (consultant) | ||
* Peter Sy (project management) | |||
[[File:UP-FM-transmitter.png|250px|thumb|right|UP-FM transmitter in | [[File:UP-FM-transmitter.png|250px|thumb|right|UP-FM transmitter in action<br/>[[File:Sample_video_for_FM.mp4|250px|thumb|right|see sample clip]]]] | ||
<br/> | <br/> | ||
| Line 81: | Line 239: | ||
==References== | ==References== | ||
* [http://www.weedpi.com/how-to/create-an-internet-radio-fm-transmitter/ "Create an Internet Radio FM Transmitter"] | |||
* [http://www.raspberry-projects.com/pi/pi-operating-systems/raspbian/scripts Scripts] | |||
<br/> | |||
==Notes== | |||
* The longer you keep this transmitter running, the hotter it gets. So you may need some extra cooling or heat dissipation. Possibilities include using repurposed heatsink from old computers (also with thermal paste), old power supply fans. | |||
* Use better antenna if you wish to make this a "permanent" transmitter. Just make sure its signal does not interfere with any established broadcast. If you stick with 87.5MHz in Metro Manila, you should be ok. | |||
* In this project, PIFM is using a dynamic IP address so you there's no need to configure the ethernet interface. | |||
<br/> | |||
==See Also== | ==See Also== | ||
Latest revision as of 22:24, 7 March 2016
DESCRIPTION
A robust, stable, inexpensive Raspberry Pi-based program FM transmitter that plays online UP-FM music radio. Radio receivers can be tuned in to 87.5MHz if the transmitter is in range.
Individuals from the different UP campuses, UP alumni and friends in different locations, lovers of Filipino indie music are encouraged to build and use this device to broadcast UP-FM in their areas.
COMPONENTS
A. For PIFM
PIFM is the core software that will turn Rasperry Pi into an FM station. These are the components you need to run it:
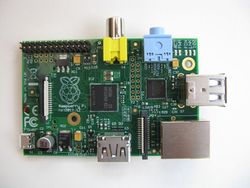
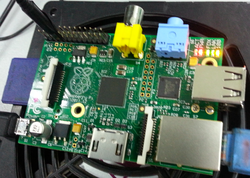
- Raspberry PI (model B).
- SD Card with Raspbian "Wheezy" OS (operating system) installed.
- Power Brick (5 volts, 2 amperes)
- Solid wire,no.22 and GPIO Cable (for the antenna)
- Soldering iron, Soldering lead, Electrical tape
B. For Programming:
PROCEDURES
A. Making a Simple Antenna
Since you may not have an ideal antenna, you will use a solid wire (no.22) as substitute. Cut a solid wire about 32 centimeters and stripe one end at least 1 cm.
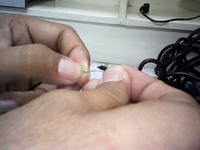
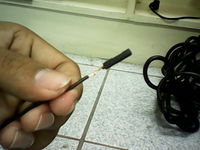
Cut the GPIO (general purpose input/output) cable wire near the socket and leave at least 1 cm wire on it. Stripe the wire near the GPIO socket. Combine both ends of the solid wire and GPIO socket using lead and soldering iron. Wrap the soldered wire and GPIO with the tape (see pictures below).
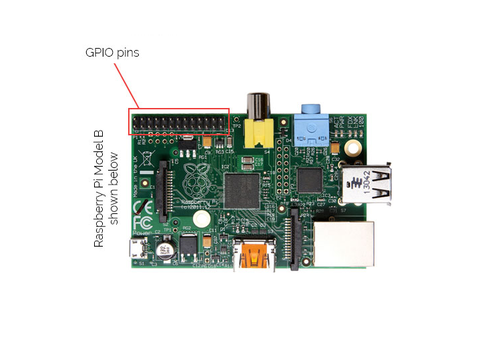
After making the Antenna, plug it in GPIO no.4 when starting the PIFM. That's the 4th pin from the left on the 2nd row of the group of GPIO pins pictured below.
B. Installing and Running Raspbian "wheezy
You will now prepare the PIfm in Raspberry PI. To do so, you must have an SD card, with Raspbian "wheezy" OS installed. One way to do it is to download and install the Win 32 disk imager to your windows PC. Also download zip file of Raspbian "wheezy" and extract the file. Plug in your SD card. Write the disk image file on the SD card.Then you have now the installed Raspbian "wheezy" OS in your SD card.
Enabling network connection
C. Programming the PIFM
Once you have installed the Raspbian "wheezy" and ran it to your Raspberry PI, you can now program the UP-FM transmitter from LXterminal.
- open your lxterminal.
- create a dedicated directory within the home directory and download the pifm files from icrobotics site as follows:
        cd ~
        mkdir pifm
        cd pifm
        wget http://www.icrobotics.co.uk/wiki/images/c/c3/Pifm.tar.gz
        tar -xvf Pifm.tar.gz
- download the application called sox (Sound Exchange) package. This is required to stream the internet radio and pipe it to PIFM program for transmission.
sudo apt-get install sox libsox-fmt-all
- create a script for easier execution.
sudo nano pifmradio.sh
Type following command line inside the nano script and press ctrl+x, Y and then Enter to save.
#!/bin/bash
sox -v .9 -t mp3 "http://updox.upd.edu.ph/stream/2/;stream.nsv" -t wav --input-buffer 80000 -r 22050 -c 1 - | sudo /home/pi/pifm/pifm - 87.5
- Change the mode of the script to be executable.
sudo chmod +x pifmradio.sh
- To run the script in the background, execute the ff command:
./pifmradio.sh &
You may get the following warning message:
wav: Length in output .wav header will be wrong since can't seek to fix it
You may safely ignore it. This is due to the fact that you are using a piped output to pifm and sox is issuing a warning that it is not possible to go back to the beginning of the stream and write the correct size into the RIFF/WAVE header, like it would be possible with a physical file.
Autostarting/Autorun UP-FM at boot
- Open new window in lxterminal.Create a folder to store the script in
          mkdir ./bin
          cd ./bin
- Create the script using the nano text editor
sudo nano script_auto_run
- In the nano editor, type this script:
          #!/bin/bash
          # Script to start our application
          echo "Doing autorun script..."
          sudo /home/pi/pifm/pifmradio.sh &
Note that when executing a command without logging in, you have to provide full paths to everything.
Save it by pressing Ctrl+X, " Y", ENTER
- This script needs to be made executable by typing this :
sudo chmod 755 script_auto_run
- You can test the script works by typing
/home/pi/bin/script_auto_run
- Setting it to be run
To launch the script at startup, edit the “rc.local” file:
sudo nano /etc/rc.local
- Add the following on the lowest line below the word fi :
/home/pi/bin/script_auto_run
Save it by pressing Ctrl+X, " Y", ENTER
Reboot your Rasperry Pi and UP-FM will run.
DIPOLE ANTENNA
RF AMPLIFIER
Development Team
- Jhon Mark Sorio
- Nestor Tiglao (consultant)
- Daniel Villareal (consultant)
- Peter Sy (project management)
Cost Estimate
- Raspberry Pi Type B 512MB: Php 1,500
- SD Card
- wire antenna
References
Notes
- The longer you keep this transmitter running, the hotter it gets. So you may need some extra cooling or heat dissipation. Possibilities include using repurposed heatsink from old computers (also with thermal paste), old power supply fans.
- Use better antenna if you wish to make this a "permanent" transmitter. Just make sure its signal does not interfere with any established broadcast. If you stick with 87.5MHz in Metro Manila, you should be ok.
- In this project, PIFM is using a dynamic IP address so you there's no need to configure the ethernet interface.
See Also

