Media Broadcaster: Difference between revisions
| [unchecked revision] | [unchecked revision] |
No edit summary |
|||
| (28 intermediate revisions by 4 users not shown) | |||
| Line 1: | Line 1: | ||
{| align="top" | |||
| __TOC__ | |||
|} | |||
=Description= | =Description= | ||
a Rasperry Pi-based appliance that | a Rasperry Pi-based appliance that streams audio or video via DILC servers. Below is the audio streamer part. | ||
=Materials= | =Materials= | ||
| Line 34: | Line 34: | ||
[[File:Ethernet.jpg | 150 px]] | [[File:Ethernet.jpg | 150 px]] | ||
* Fan | |||
[[File:AC Blower Fan.jpg ] 150 px] | |||
B. For Programming | B. For Programming | ||
| Line 42: | Line 46: | ||
*[http://iskwiki.upd.edu.ph/index.php/File:Vga_to_hdmi_cable.jpg#.U3VdMbVDsyY VGA to HDMI Cable] or [http://iskwiki.upd.edu.ph/index.php/File:Images_(1).jpg#.U3Vdg7VDsyY RCA Cable] | *[http://iskwiki.upd.edu.ph/index.php/File:Vga_to_hdmi_cable.jpg#.U3VdMbVDsyY VGA to HDMI Cable] or [http://iskwiki.upd.edu.ph/index.php/File:Images_(1).jpg#.U3Vdg7VDsyY RCA Cable] | ||
SET-UP | |||
[[File:10320564 858525150830884 7587303218053427874 n.jpg ]] | |||
---- | ---- | ||
=Procedure= | =Procedure= | ||
| Line 50: | Line 57: | ||
A. Installing and Running the Rasbian Wheezy OS (Operating System) | A. Installing and Running the Rasbian Wheezy OS (Operating System) | ||
* Use [http://sourceforge.net/projects/win32diskimager/ Win32 Disk Imager] to write a boot image to your SD Card. | * Use [http://sourceforge.net/projects/win32diskimager/ Win32 Disk Imager] to write a boot image to your SD Card. | ||
* Download the [http://www.raspberrypi.org/downloads/Raspbian Wheezy zip file] and extract the file. | * Download the [http://www.raspberrypi.org/downloads/Raspbian Wheezy zip file] and extract the file. | ||
* Insert the SD Card into your Raspberry Pi and write the disk image file using the installed win32 Disk Imager. | * Insert the SD Card into your Raspberry Pi and write the disk image file using the installed win32 Disk Imager. | ||
B. Setting Static IP | B. Setting Static IP | ||
*Check first the set-up by | *Check first the set-up by | ||
'''cat /etc/network/interfaces''' | |||
''' | then the line '''iface eth0 inet dhcp''' implies that the IP address is via DHCP which is dynamically registered by the router. This is what we want to change, if necessary. | ||
*Get Information | |||
'''ifconfig''' | |||
with these you will get the different information that we will use later such as: | |||
(sample information below) | |||
'''inet address (Pi's Current IP Address)= 192.168.0.21 ''' | |||
''' | '''Bcast (The Broadcast IP Range) = 192.168.255.255''' | ||
'''Mask (Subnet Mask Address) = 255.255.0.0''' | |||
then | |||
'''netstat -nr''' or '''route n''' | |||
(note that these commands will give you the same information) | |||
Get also the | |||
(sample information below) | |||
''' | '''Gateway Address = 192.168.0.231''' | ||
'''Destination Address = 192.168.0.0 ''' | |||
*Editing Network Configuration | |||
open the file /etc/network/interfaces by: | |||
''' | '''sudo nano /etc/network/interfaces''' | ||
change the line | |||
'''iface eth0 inet dhcp''' | |||
to | |||
'''iface eth0 inet static''' | |||
after this line, directly type the information that we gathered a while ago and save and exit by '''Ctrl+o and Ctrl+X''' | |||
next is to reboot.. | |||
'''sudo reboot''' | |||
to check: | |||
'''ifconfig''' | |||
will reveal the changes or try to ping it with your IP Address by | |||
''' | '''ping (your IP Address) -c 5''' | ||
C.Programming for the Audio Streaming | |||
After installing and running the OS of your Raspberry Pi, you are now ready to program the audio streaming. | |||
Open the '''LX Terminal''', | |||
*Install PulseAudio and these preference GUI with the command | |||
'''sudo apt-get install pulseaudio''' | |||
'''sudo | '''sudo apt-get paprefs''' | ||
'''sudo reboot''' | |||
''' | *After the system being rebooted, next thing to do is to edit and add the following lines in the file '''''/etc/pulse/daemon.conf''''' by these command | ||
'''sudo nano /etc/pulse/daemon.conf''' | |||
lines: | |||
'''resample-method = ffmpeg''' | |||
''' | '''default-sample-rate = 44100''' | ||
'''alternate-sample-rate = 44100''' | |||
after these save and exit by Ctrl+o and Ctrl+x | |||
*To make the Raspberry Pi audio server appearing automatically in your "Sound Setting" on every client (PC) and the server (raspberry Pi). | |||
'''sudo sed -i 's/AVAHI_DAEMON_DETECT_LOCAL=1/AVAHI_DAEMON_DETECT_LOCAL=0/g' /etc/default/avahi-daemon''' | |||
*Activate the network feature of PulseAudio on both client and server. | |||
'''paprefs''' | |||
For the server mark the following boxes | |||
''' | '''Network Server -Enable network access to local sound devices''' | ||
'''Network Server -Allow other machines on the LAN to discover local sound devices''' | |||
''' | '''Network Server -Don't require authentication''' | ||
For the client you want to stream from the server (Raspberry Pi) | |||
'''Network Access -Make discoverable PulseAudio network sound devices available locally''' | |||
* Reboot the both server and the client by: | |||
'''sudo reboot''' | |||
After the system reboots, the '''Sound Setting''' should appear like these: | |||
[[File:Screenshot from 2013-10-25 10-20-28.png | 150 px]] | |||
To check if the streaming is working plug in the Computer Audio Microphone in the USB Sound card and start to talk. Note that there will be a delay of 1000ms-2000ms. | |||
D. Connecting the Pulseaudio to the Icecast2 server using the Darkice | |||
* Compile and Install Darkice | |||
'''$ sudo sh -c "echo 'deb-src http://mirrordirector.raspbian.org/raspbian/ wheezy main contrib non-free rpi' >> /etc/apt/sources.list"''' | |||
'''$ sudo apt-get update''' | |||
Install some additional packages | |||
'''sudo apt-get --no-install-recommends install build-essential devscripts autotools-dev fakeroot dpkg-dev debhelper autotools-dev dh-make quilt ccache libsamplerate0-dev libpulse-dev libaudio-dev lame libjack-jackd2-dev libasound-dev libtwolame-dev libfaad-dev libflac-dev libshout3-dev libmp3lame-dev''' | |||
Create a working directory | |||
'''$ mkdir src && cd src/''' | |||
Get a source package of darkice | |||
''' | '''$ apt-get source darkice''' | ||
change the compile configuration to match the Raspbian environment | |||
'''$ cd darkice-1.0/''' | |||
'''$ vi debian/rules''' | |||
change the contents to: | |||
[http://www.t3node.com/fileadmin/user_upload/linux/rules rules] | |||
''' | '''Esc + : + q + ~''' to save and exit | ||
Change the version of the package to reflect mp3 support. | |||
'''$ debchange -v 1.0-999~mp3+1''' | |||
Add comments to the changelog like: | |||
''' | '''darkice (1.0-999~mp3+1) UNRELEASED; urgency=low''' | ||
''' | '''* New build with mp3 support''' | ||
'''-- <pi@raspberrypi> Sat, 11 Aug 2012 13:35:06 +0000''' | |||
Now build and intall the darkice package | |||
'''$ dpkg-buildpackage -rfakeroot -uc -b''' | |||
'''$ sudo dpkg -i ../darkice_1.0-999~mp3+1_armhf.deb''' | |||
* Configuring DarkIce | |||
'''sudo | '''$ sudo cp darkice.cfg /etc/''' | ||
Example of configuration (darkice.cfg) | |||
# see the darkice.cfg man page for details | |||
# this section describes general aspects of the live streaming session | |||
[general] | |||
duration = 0 # duration of encoding, in seconds. 0 means forever | |||
bufferSecs = 5 # size of internal slip buffer, in seconds | |||
reconnect = yes # reconnect to the server(s) if disconnected | |||
# this section describes the audio input that will be streamed | |||
[input] | |||
device = hw:1,0 # Alsa soundcard device for the audio input | |||
sampleRate = 44100 # sample rate in Hz. try 11025, 22050 or 44100 | |||
bitsPerSample = 16 # bits per sample. try 16 | |||
channel = 1 # channels. 1 = mono, 2 = stereo | |||
# this section describes a streaming connection to an IceCast2 server | |||
# there may be up to 8 of these sections, named [icecast2-0] ... [icecast2-7] | |||
# these can be mixed with [icecast-x] and [shoutcast-x] sections | |||
[icecast2-0] | |||
bitrateMode = vbr # variable bit rate | |||
format = mp3 # format of the stream: mp3 | |||
quality = 0.6 # quality of the stream sent to the server | |||
server = localhost # host name of the server | |||
port = 8000 # port of the IceCast2 server, usually 8000 | |||
password = SOURCE_PASSWORD # source password to the IceCast2 server | |||
mountPoint = raspi # mount point of this stream on the IceCast2 server | |||
name = RasPi # name of the stream | |||
description = DarkIce on RasPi # description of the stream | |||
url = http://localhost # URL related to the stream | |||
genre = my genre # genre of the stream | |||
public = no # advertise this stream? | |||
localDumpFile = recording.mp3 # Record also to a file | |||
Configuration options are explained in the manpage by executing the command: | |||
'''$ man darkice.cfg''' | |||
To find the ALSA input devices, | |||
''' | '''$ arecord -l''' | ||
It will appear like, | |||
**** List of CAPTURE Hardware Devices **** | |||
card 1: U0x46d0x825 [USB Device 0x46d:0x825], device 0: USB Audio [USB Audio] | |||
Subdevices: 1/1 | |||
Subdevice #0: subdevice #0 | |||
*Installing Icecast2 | |||
'''$ sudo aptitude install icecast2''' | |||
After installing Icecast it will be needed to configure.Set a hostname and passwords for source, relay and administration.The source password will be needed in the darkice.cfg configuration. | |||
* Running the DarkIce to Stream audio | |||
'''# nice --20 darkice -c /etc/darkice.cfg''' | |||
To start the streaming automatically, use crontab command: | |||
open the crontab file by: | |||
'''sudo | '''sudo nano crontab -e''' | ||
add the line, note that there should be no #'s in front of it | |||
'''@reboot /usr/bin/darkice''' | |||
save by Ctrl+x, y and enter | |||
when the RPi is rebooted the darkice will automatically start streaming in the Icecast server. | |||
<br /><br /> | |||
=Project Team= | =Project Team= | ||
| Line 220: | Line 317: | ||
---- | ---- | ||
=References= | =References= | ||
* | * [http://solutions4linux.blogspot.com/2013/10/using-raspberry-pi-with-raspbian-as.html Raspberry Pi with Raspbian as streaming server via Pulse Audio] | ||
* | * [http://www.t3node.com/blog/live-streaming-mp3-audio-with-darkice-and-icecast2-on-raspberry-pi/ Live mp3 streaming from audio-in with DarkIce and Icecast2 on Raspberry Pi] | ||
* [http://mattkaar.com/blog/2013/05/26/web-streaming-with-the-raspberry-pi-baby-monitor/ Web Streaming With the Raspberry Pi Baby Monitor] | |||
*[https://www.modmypi.com/blog/tutorial-how-to-give-your-raspberry-pi-a-static-ip-address Setting Static IP for the Raspberry Pi] | |||
*[http://martinjhiggins.co.uk/shoutcast-streaming-from-a-raspberry-pi/ Automatic streaming audio to the Icecast Server] | |||
Latest revision as of 06:29, 4 December 2019
Description
a Rasperry Pi-based appliance that streams audio or video via DILC servers. Below is the audio streamer part.
Materials
A. Audio Streaming
* Raspberry Pi (Model B)
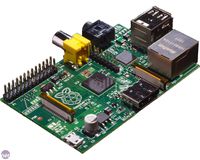

* SD Card with installed Raspbian "Wheezy" OS (Operating System)


* USB Sound Card


* Audio Computer Microphone


* USB Micro Cable with Power Brick (5 Volts, 2 Amperes)


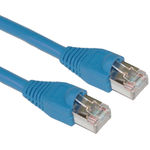
* Ethernet Cable

* Fan
[[File:AC Blower Fan.jpg ] 150 px]
B. For Programming
  *PC Monitor
  *USB Keyboard
  *USB Mouse
  *VGA to HDMI Cable or RCA Cable
SET-UP


Procedure
A. Installing and Running the Rasbian Wheezy OS (Operating System)
* Use Win32 Disk Imager to write a boot image to your SD Card.
* Download the Wheezy zip file and extract the file.
* Insert the SD Card into your Raspberry Pi and write the disk image file using the installed win32 Disk Imager.
B. Setting Static IP
*Check first the set-up by
cat /etc/network/interfaces
then the line iface eth0 inet dhcp implies that the IP address is via DHCP which is dynamically registered by the router. This is what we want to change, if necessary.
*Get Information
ifconfig
with these you will get the different information that we will use later such as:
(sample information below)
inet address (Pi's Current IP Address)= 192.168.0.21
Bcast (The Broadcast IP Range) = 192.168.255.255
           Mask  (Subnet Mask Address)           = 255.255.0.0
  then
netstat -nr or route n
(note that these commands will give you the same information)
Get also the
(sample information below)
Gateway Address = 192.168.0.231
Destination Address = 192.168.0.0
*Editing Network Configuration
open the file /etc/network/interfaces by:
sudo nano /etc/network/interfaces
change the line
                         iface eth0 inet dhcp
   to
                       iface eth0 inet static
after this line, directly type the information that we gathered a while ago and save and exit by Ctrl+o and Ctrl+X
   next is to reboot..
                          sudo reboot
  to check:
                           ifconfig
will reveal the changes or try to ping it with your IP Address by
ping (your IP Address) -c 5
C.Programming for the Audio Streaming
After installing and running the OS of your Raspberry Pi, you are now ready to program the audio streaming.
Open the LX Terminal,
*Install PulseAudio and these preference GUI with the command
sudo apt-get install pulseaudio
sudo apt-get paprefs
sudo reboot
*After the system being rebooted, next thing to do is to edit and add the following lines in the file /etc/pulse/daemon.conf by these command
                  sudo nano /etc/pulse/daemon.conf
  lines:
        resample-method = ffmpeg
default-sample-rate = 44100
alternate-sample-rate = 44100
after these save and exit by Ctrl+o and Ctrl+x
*To make the Raspberry Pi audio server appearing automatically in your "Sound Setting" on every client (PC) and the server (raspberry Pi).
sudo sed -i 's/AVAHI_DAEMON_DETECT_LOCAL=1/AVAHI_DAEMON_DETECT_LOCAL=0/g' /etc/default/avahi-daemon
*Activate the network feature of PulseAudio on both client and server.
paprefs
For the server mark the following boxes
Network Server -Enable network access to local sound devices
Network Server -Allow other machines on the LAN to discover local sound devices
Network Server -Don't require authentication
For the client you want to stream from the server (Raspberry Pi)
Network Access -Make discoverable PulseAudio network sound devices available locally
* Reboot the both server and the client by:
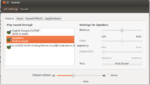
sudo reboot
After the system reboots, the Sound Setting should appear like these:

.jpg#.U3Vdg7VDsyY)
To check if the streaming is working plug in the Computer Audio Microphone in the USB Sound card and start to talk. Note that there will be a delay of 1000ms-2000ms.
D. Connecting the Pulseaudio to the Icecast2 server using the Darkice
  * Compile and Install Darkice

                  $ sudo sh -c "echo 'deb-src http://mirrordirector.raspbian.org/raspbian/ wheezy main contrib non-free rpi' >> /etc/apt/sources.list"
$ sudo apt-get update
Install some additional packages
sudo apt-get --no-install-recommends install build-essential devscripts autotools-dev fakeroot dpkg-dev debhelper autotools-dev dh-make quilt ccache libsamplerate0-dev libpulse-dev libaudio-dev lame libjack-jackd2-dev libasound-dev libtwolame-dev libfaad-dev libflac-dev libshout3-dev libmp3lame-dev
Create a working directory
$ mkdir src && cd src/
Get a source package of darkice
$ apt-get source darkice
change the compile configuration to match the Raspbian environment
$ cd darkice-1.0/
                           $ vi debian/rules
  change the contents to:
rules
Esc + : + q + ~ to save and exit
Change the version of the package to reflect mp3 support.
$ debchange -v 1.0-999~mp3+1
Add comments to the changelog like:
darkice (1.0-999~mp3+1) UNRELEASED; urgency=low
* New build with mp3 support
-- <pi@raspberrypi> Sat, 11 Aug 2012 13:35:06 +0000
Now build and intall the darkice package
$ dpkg-buildpackage -rfakeroot -uc -b
$ sudo dpkg -i ../darkice_1.0-999~mp3+1_armhf.deb
* Configuring DarkIce
$ sudo cp darkice.cfg /etc/
Example of configuration (darkice.cfg)
# see the darkice.cfg man page for details
# this section describes general aspects of the live streaming session
[general]
duration      = 0                # duration of encoding, in seconds. 0 means    forever
bufferSecs    = 5                # size of internal slip buffer, in seconds
reconnect     = yes              # reconnect to the server(s) if disconnected
# this section describes the audio input that will be streamed
[input]
device        = hw:1,0           # Alsa soundcard device for the audio input
sampleRate    = 44100            # sample rate in Hz. try 11025, 22050 or 44100
bitsPerSample = 16               # bits per sample. try 16
channel       = 1                # channels. 1 = mono, 2 = stereo
# this section describes a streaming connection to an IceCast2 server
# there may be up to 8 of these sections, named [icecast2-0] ... [icecast2-7]
# these can be mixed with [icecast-x] and [shoutcast-x] sections
[icecast2-0]
bitrateMode   = vbr              # variable bit rate
format        = mp3              # format of the stream: mp3
quality       = 0.6              # quality of the stream sent to the server
server        = localhost        # host name of the server
port          = 8000             # port of the IceCast2 server, usually 8000
password      = SOURCE_PASSWORD  # source password to the IceCast2 server
mountPoint    = raspi         # mount point of this stream on the IceCast2     server
name          = RasPi            # name of the stream
description   = DarkIce on RasPi # description of the stream
url           = http://localhost # URL related to the stream
genre         = my genre         # genre of the stream
public        = no               # advertise this stream?
localDumpFile = recording.mp3    # Record also to a file
Configuration options are explained in the manpage by executing the command:
$ man darkice.cfg
To find the ALSA input devices,
                           $ arecord -l
  It will appear like,
        **** List of CAPTURE Hardware Devices ****
 card 1: U0x46d0x825 [USB Device 0x46d:0x825], device 0: USB Audio [USB Audio]
 Subdevices: 1/1
 Subdevice #0: subdevice #0
*Installing Icecast2
$ sudo aptitude install icecast2
After installing Icecast it will be needed to configure.Set a hostname and passwords for source, relay and administration.The source password will be needed in the darkice.cfg configuration.
* Running the DarkIce to Stream audio
# nice --20 darkice -c /etc/darkice.cfg
To start the streaming automatically, use crontab command:
open the crontab file by:
sudo nano crontab -e
add the line, note that there should be no #'s in front of it
@reboot /usr/bin/darkice
save by Ctrl+x, y and enter
when the RPi is rebooted the darkice will automatically start streaming in the Icecast server.
Project Team
- Catherine Bagotsay (developer)
- Dawn Benigno (consultant)
- Dan Villareal (consultant)
- Peter Sy (consultant)
References
- Raspberry Pi with Raspbian as streaming server via Pulse Audio
- Live mp3 streaming from audio-in with DarkIce and Icecast2 on Raspberry Pi
- Web Streaming With the Raspberry Pi Baby Monitor
- Setting Static IP for the Raspberry Pi
- Automatic streaming audio to the Icecast Server