
Draft:Create a New Page: Difference between revisions
No edit summary |
|||
| Line 5: | Line 5: | ||
# Click Log in at the top right of the page.[[File:Login bar.png|alt=Login bar|frameless|1011x1011px]] | # Click Log in at the top right of the page.[[File:Login bar.png|alt=Login bar|frameless|1011x1011px]] | ||
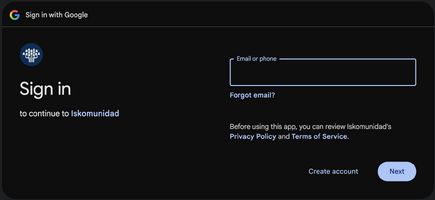
# Use your UP Mail ''(username@up.edu.ph)'' to sign in.<br />[[File:Google sign in.png|alt=Sign in using up mail|frameless]] | # Use your UP Mail ''(username@up.edu.ph)'' to sign in.<br />[[File:Google sign in.png|alt=Sign in using up mail|frameless|435x435px]] | ||
# Once logged in, you should see your username in the upper-right corner of the header bar.<br />*''Please note that your username defaults to your UP Mail address.''<br />[[File:Username headerbar.png|alt=username|frameless]] | # Once logged in, you should see your username in the upper-right corner of the header bar.<br />*''Please note that your username defaults to your UP Mail address.''<br />[[File:Username headerbar.png|alt=username|frameless]] | ||
== Step 2: Create a New Page == | == Step 2: Create a New Page == | ||
# Enter the title of your proposed page in the search bar.<br />[[File:Search title.png|alt=Search bar|frameless]] | # Enter the title of your proposed page in the search bar.<br />[[File:Search title.png|alt=Search bar|frameless|637x637px]] | ||
# Search for the title. | # Search for the title. | ||
# If the page does not exist, look for an option such as '''Create the page.'''<br />[[File:Unique page-whole.png|alt=Create Page|frameless]] | # If the page does not exist, look for an option such as '''Create the page.'''<br />[[File:Unique page-whole.png|alt=Create Page|frameless|505x505px]] | ||
# Click on the title of your proposed page to open the editor.<br />[[File:Unique page-zoom.png|alt=Title of your page|frameless]] | # Click on the title of your proposed page to open the editor.<br />[[File:Unique page-zoom.png|alt=Title of your page|frameless|399x399px]] | ||
== Step 3: Choose your Editing mode == | |||
# Once you clicked on your page title, you will be directed to the page editor.<br />[[File:Page editor.png|alt=Page editor|frameless|528x528px]] | |||
# By default, Iskomunidad uses the '''VisualEditor''', which is recommended for beginners because it works similarly to a word processor (like Microsoft Word). You can simply type and format text directly, apply headings, format text, lists, and insert links, images, and tables through the toolbar options.<br />[[File:Editing modes.png|alt=editing modes|frameless]] | |||
#* Visual editor - Best for beginners who prefers a simple, user-friendly editing experience with visual formatting tools.<br />[[File:Visual Editor.png|alt=Visual Editor|frameless|461x461px]] | |||
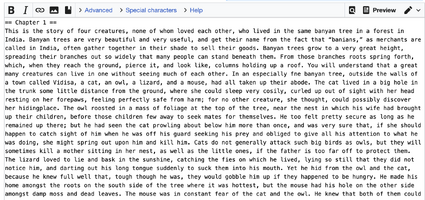
#* Source editing - ideal for users who need greater control over page's markup. This mode allows you to enter wiki syntax manually, use templates and categories, and add supported HTML or extension-specific markup.<br />[[File:Source editor.png|alt=Source Editor|frameless|425x425px]] | |||
Revision as of 07:19, 9 October 2026
How to Create a New Page
This tutorial covers the process in creating a page to formatting its contents, adding images and links, and publishing the finished page. It assumes that users can log in and have permission to create or edit pages.
Step 1: Log in to the Website
- Click Log in at the top right of the page.

- Use your UP Mail (username@up.edu.ph) to sign in.
- Once logged in, you should see your username in the upper-right corner of the header bar.
*Please note that your username defaults to your UP Mail address.


Step 2: Create a New Page
- Enter the title of your proposed page in the search bar.

- Search for the title.
- If the page does not exist, look for an option such as Create the page.
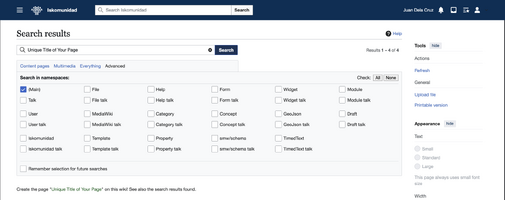
- Click on the title of your proposed page to open the editor.



Step 3: Choose your Editing mode
- Once you clicked on your page title, you will be directed to the page editor.
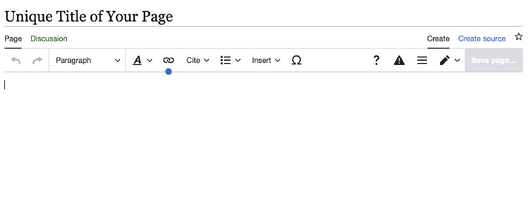
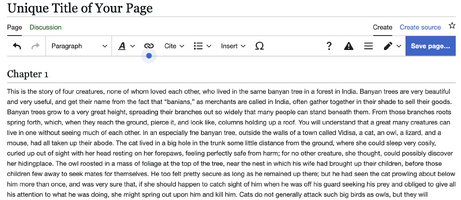
- By default, Iskomunidad uses the VisualEditor, which is recommended for beginners because it works similarly to a word processor (like Microsoft Word). You can simply type and format text directly, apply headings, format text, lists, and insert links, images, and tables through the toolbar options.
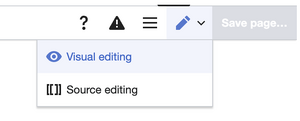
- Visual editor - Best for beginners who prefers a simple, user-friendly editing experience with visual formatting tools.
- Source editing - ideal for users who need greater control over page's markup. This mode allows you to enter wiki syntax manually, use templates and categories, and add supported HTML or extension-specific markup.
- Visual editor - Best for beginners who prefers a simple, user-friendly editing experience with visual formatting tools.


