How to Embed Editable Google Document in your UVLe Course: Difference between revisions
m (Uvle moved page Embed Editable Google Document to How to Embed Editable Google Document in your UVLe Course) |
|||
| (16 intermediate revisions by 2 users not shown) | |||
| Line 1: | Line 1: | ||
==Embed Editable Google Document in your UVLe course== | ==Embed Editable Google Document in your UVLe course== | ||
<br> | <br> | ||
Once you have created a document on your Google Drive account, you can embed it in your UVLe course. The document can be viewed or edited by your students depending on the permission you've | Once you have created a document on your Google Drive account, you can embed it in your UVLe course. The document can be viewed or edited by your students depending on the permission you've set for it. | ||
Here is a [http://uvle.up.edu.ph/course/view.php?id=3§ion=10 sample embedded Google document]. | Here is a [http://uvle.up.edu.ph/course/view.php?id=3§ion=10 sample embedded Google document]. | ||
<br> | <br> | ||
=Preparing your Google Document= | ==Preparing your Google Document== | ||
<br> | <br> | ||
1. First you need a document (spreadsheet, word, drawing, form) on your [http://drive.google.com Google Drive account]. You can either create or upload an existing file. | 1. First you need a document (spreadsheet, word, drawing, form) on your [http://drive.google.com Google Drive account]. You can either create or upload an existing file. | ||
<br><br> | |||
[[File: Share_google.png|right|300px]] | |||
2. In your document, make sure your settings allow people to edit without requiring them to login. Forcing students to log in with their Google account will not be able to edit the document directly on your course page. | |||
<br><br> | |||
3. Change the '''share''' settings on your document by clicking the '''SHARE''' button on the upper right-hand corner of the page. | |||
<br><br> | |||
4. Check the permission of the document. The default status for a Google Document is '''private'''. Click on the '''change''' link. (shown in A) | |||
<br><br> | |||
5. Set the Visibility options of the document by choosing '''Anyone with the link''' option, then allow anyone to edit the file. (shown in B) | |||
<br><br> | |||
6. Click '''Save''' once you're finished. | |||
<br><br> | |||
7. Copy the link (shown in A) and paste it in your notepad or any text editor. | |||
<br><br> | |||
==Embed Code== | |||
<br> | <br> | ||
You need to create the correct code to embed it in your UVLe course page. Don't forget to add '''/edit''' on your link. | |||
<br><br> | |||
<code> | |||
<iframe height="400px" width="100%" align="middle" border="0" src="YOUR GOOGLE DOCUMENT URL/edit"></iframe> | |||
</code> | |||
<br> | <br> | ||
Change the height and width of your document. | |||
<br><br> | |||
==Embedding the Document in your UVLe course== | |||
<br> | <br> | ||
1. Click the '''Turn Editing On''' on the upper-right hand corner of your course page. | |||
<br><br> | |||
2. If you want to embed a document in your course page, you must add a label. Otherwise, if you want it to be redirected to another page, you must add a page. To do this, click '''+Add an activity or resource''' and look for a label or a page. | |||
<br><br> | |||
3. On the inline text editor, click '''Show editing tools'''. | |||
<br><br> | |||
[[File:texteditor_google.png|center]] | |||
4. Click the '''HTML''' icon then paste the embed code that you've created. | |||
Then click '''UPDATE'''. | |||
<br><br> | |||
[[File:embed_google.png|center]] | |||
5. The inline editor will display the Google document. | |||
<br><br> | |||
6. Once done, click '''Save and return to course'''. | |||
<br><br> | |||
[[File:course_embed_google.png|center]] | |||
<br> | <br> | ||
=See Also= | |||
[ | * [[Uvle#Modules.2C_Plugins.2C_and_Blocks|Modules, Plugins and Blocks]] | ||
* [[UVLe Quiz and Assignment]] | |||
* [[Uvle|UVLe]] | |||
Latest revision as of 06:17, 28 November 2013
Embed Editable Google Document in your UVLe course
Once you have created a document on your Google Drive account, you can embed it in your UVLe course. The document can be viewed or edited by your students depending on the permission you've set for it.
Here is a sample embedded Google document.
Preparing your Google Document
1. First you need a document (spreadsheet, word, drawing, form) on your Google Drive account. You can either create or upload an existing file.

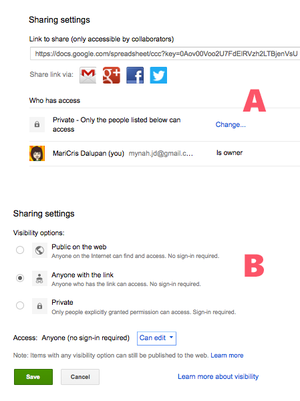
2. In your document, make sure your settings allow people to edit without requiring them to login. Forcing students to log in with their Google account will not be able to edit the document directly on your course page.
3. Change the share settings on your document by clicking the SHARE button on the upper right-hand corner of the page.
4. Check the permission of the document. The default status for a Google Document is private. Click on the change link. (shown in A)
5. Set the Visibility options of the document by choosing Anyone with the link option, then allow anyone to edit the file. (shown in B)
6. Click Save once you're finished.
7. Copy the link (shown in A) and paste it in your notepad or any text editor.
Embed Code
You need to create the correct code to embed it in your UVLe course page. Don't forget to add /edit on your link.
<iframe height="400px" width="100%" align="middle" border="0" src="YOUR GOOGLE DOCUMENT URL/edit"></iframe>
Change the height and width of your document.
Embedding the Document in your UVLe course
1. Click the Turn Editing On on the upper-right hand corner of your course page.
2. If you want to embed a document in your course page, you must add a label. Otherwise, if you want it to be redirected to another page, you must add a page. To do this, click +Add an activity or resource and look for a label or a page.
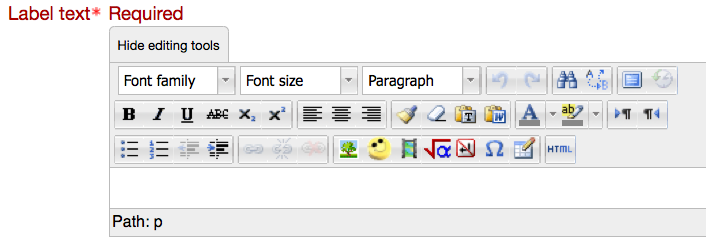
3. On the inline text editor, click Show editing tools.

4. Click the HTML icon then paste the embed code that you've created.
Then click UPDATE.

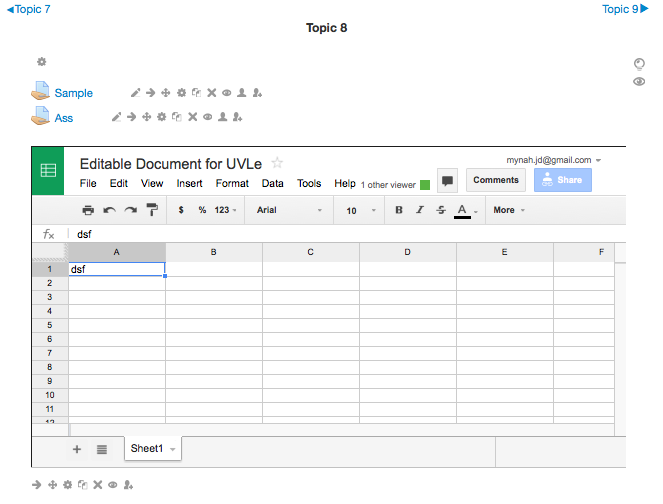
5. The inline editor will display the Google document.
6. Once done, click Save and return to course.
